 English
This tutorial is regarding mitigation of layer 7 http flood using nginx and fail2ban. In this tutorial we assumed to have installed Centos Web Panel.
How to Do It
1) Enable Nginx:
Login to Centos Web Panel (http://your-server-ip:2030) and navigate to Apache Settings --> Select WebServers
Select Apache & Nginx Reverse Proxy (Nginx on port 80 and apache on port 8181) and click on Save and Rebuild Configuration
Once nginx is installed click on Rebuild Virtual Host.
2) Setup Nginx to Block Request.
cd /etc/nginx
nano nginx.conf
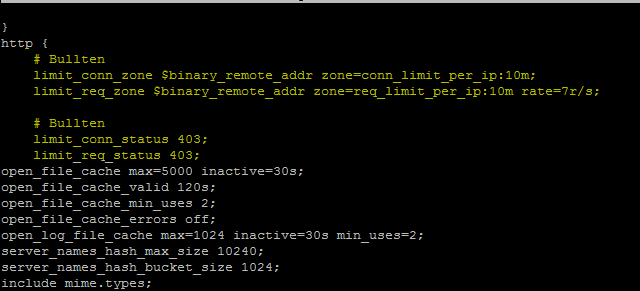
Find http { and paste the lines as below.
# BULLTEN
    limit_conn_zone $binary_remote_addr zone=conn_limit_per_ip:10m;
    limit_req_zone $binary_remote_addr zone=req_limit_per_ip:10m rate=7r/s;

# BULLTEN
    limit_conn_status 403;
    limit_req_status 403;
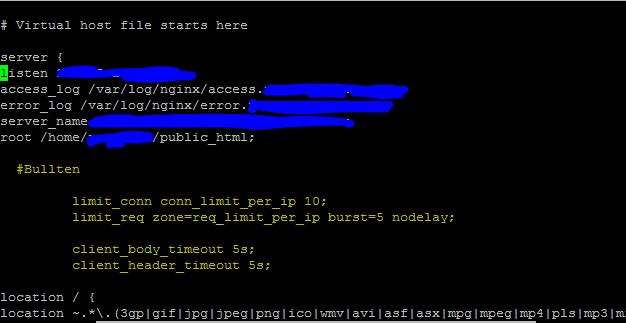
3) Now open your virtual host file located in /etc/nginx/conf.d. Replace yourdomainname.com.conf with your actual domain config file.
cd /etc/nginx/conf.d
nano yourdomain.com.conf
Find location / { and above that add the lines below
         # BULLTEN

         limit_conn conn_limit_per_ip 10;
         limit_req zone=req_limit_per_ip burst=5 nodelay;

         client_body_timeout 5s;
         client_header_timeout 5s;
4) Restart Nginx
service nginx restart
Check your nginx log file to know if connection is being successfully blocked. Blocked connection will have 403 error code. Replace yourdomain.com with your actual domain name.
tail -f /var/log/nginx/error.yourdomain.com.log
Your nginx is now ready to mitigate layer 7 DDOS. Change the above values as needed by your configuration.
5) Install fail2ban
yum install fail2ban -y
cd /etc/fail2ban
cp jail.conf jail.local
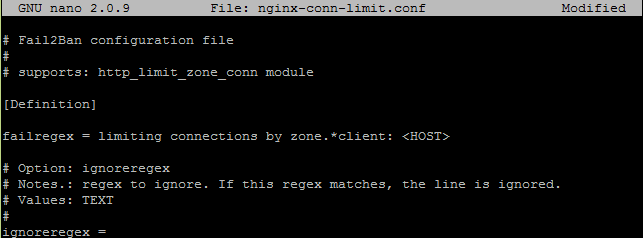
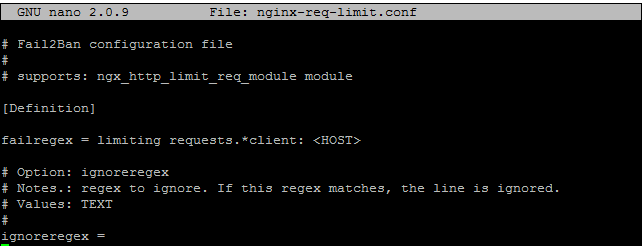
6) Now download two files named nginx-conn-limit.conf and nginx-req-limit.conf in /etc/fail2ban/filter.d
wget --output-document="/etc/fail2ban/filter.d/nginx-conn-limit.conf" http://dl-package.bullten.in/cwp/files/nginx_limit/nginx-conn-limit.txt
wget --output-document="/etc/fail2ban/filter.d/nginx-req-limit.conf" http://dl-package.bullten.in/cwp/files/nginx_limit/nginx-req-limit.txt
8) Edit jail.local and add the lines below. Replace yourdomain.com with your configured domain.
cd /etc/fail2ban
nano jail.local
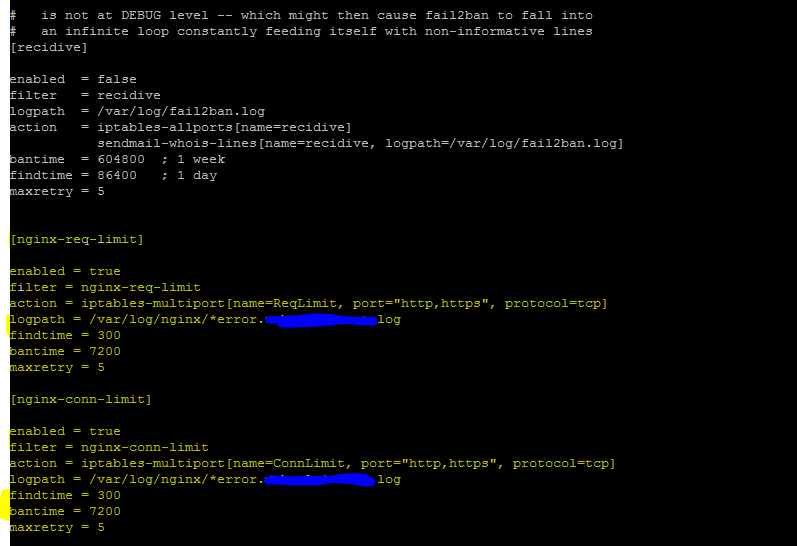
[nginx-req-limit]

enabled = true
filter = nginx-req-limit
action = iptables-multiport[name=ReqLimit, port="http,https", protocol=tcp]
logpath = /var/log/nginx/*error.yourdomain.com.log
findtime = 300
bantime = 7200
maxretry = 5

[nginx-conn-limit]

enabled = true
filter = nginx-conn-limit
action = iptables-multiport[name=ConnLimit, port="http,https", protocol=tcp]
logpath = /var/log/nginx/*error.yourdomain.com.log
findtime = 300
bantime = 7200
maxretry = 5
9) Now start fail2ban
service fail2ban start
10) Check fail2ban rules status
fail2ban-client status nginx-req-limit
fail2ban-client status nginx-conn-limit
11) Check fail2ban Log
tail -f /var/log/fail2ban.log
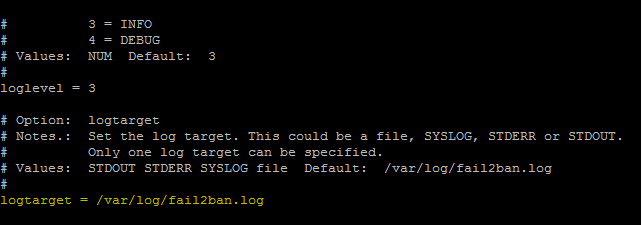
If /var/log/fail2ban.log doesnt exist then follow the below step.
cd /etc/fail2ban
nano fail2ban.conf
Find logtarget = and change this whole line with logtarget = /var/log/fail2ban.log
Restart Fail2ban
service fail2ban restart
Your fail2ban is now configured to monitore nginx error log file and ban the IP using iptables.
